Advanced Custom Fields & Assets
Advanced Custom Assets allow you to go beyond standard pages and posts by creating fully customized asset types tailored to your project’s needs. Instead of adapting your structure to fit predefined formats, you can define your own asset types with dedicated fields for text, images, links, dates, or any other data you require. This flexibility makes it possible to build structured content for use cases such as portfolios, team members, movie reviews, properties, products, events, or anything else your project demands. By combining custom fields with dynamic display tools, Advanced Custom Assets provide scalable organization, cleaner content management, and complete control over how specialized content is structured and presented.
Creating a Custom Asset
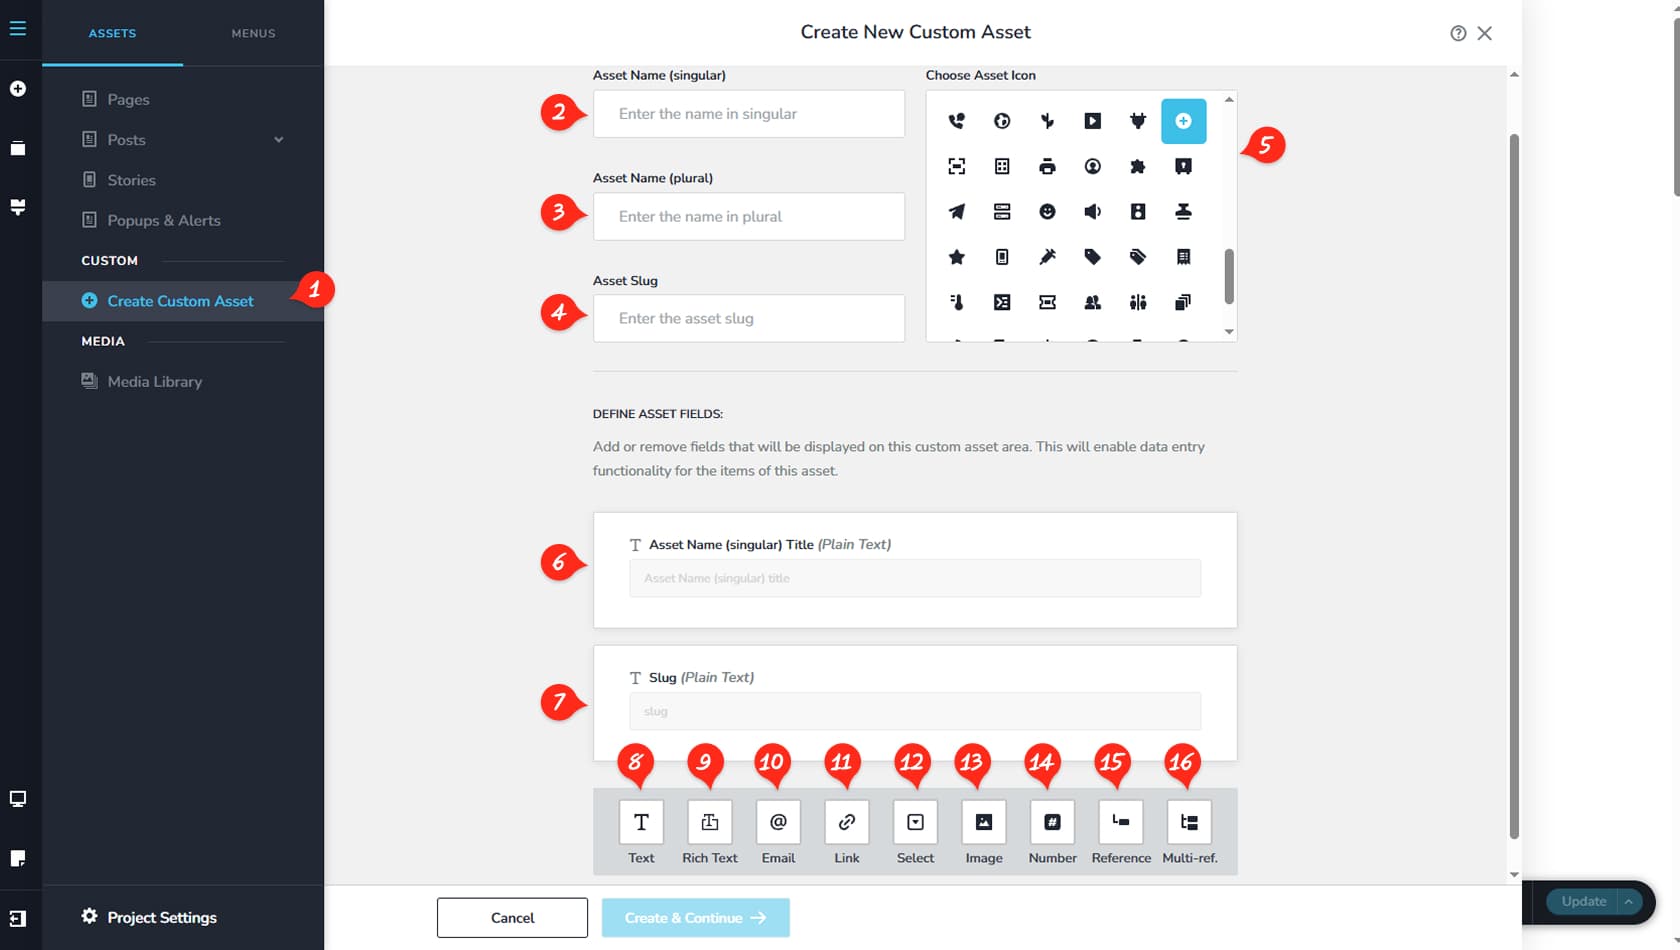
Create Custom Asset
To create a new Custom Asset, select the “Create Custom Asset” option in the Assets section of your CMS. This opens a configuration panel where you can define a new asset type.
Asset Name (Singular)
Here you can set the asset name as it will appear in singular form.
Asset Name (Plural)
This field allows you to define the plural name of the asset.
Asset Slug
Here you can assign a slug for the asset, which is used for SEO and indexing purposes.
Asset Icon
This option lets you choose an icon for the asset, which will appear next to its name in the CMS sidebar.
Title Field
The Title field is mandatory, which is why it appears by default in the asset structure.
Slug Field
The Slug field is also required and is therefore included automatically.
Text Field
Below, you can add custom fields to your asset type. The first available option is the Text field. Once added, you can configure its label, description, required status, placeholder text, and define minimum and maximum character limits.
You can remove any field at any time by selecting the delete icon in its toolbar.
Rich Text Field
Here you can add a Rich Text field to include paragraph-style content. Once added, you can configure its label, description, required status, placeholder text, and minimum or maximum character length.
Email Field
This option allows you to add an Email field. After adding it, you can adjust its label, description, required status, and placeholder.
Link Field
Here you can add a Link field. You can define its label, description, required status, and assign a URL.
Select Field
This setting adds a Select field. You can customize its label, description, required status, placeholder, and define multiple dropdown options.
Image Field
Here you can add an Image field. Once included, you can edit its label, description, or mark it as required.
Numeric Field
This option adds a Number field for numeric input. You can configure its label, description, required status, placeholder, and set minimum and maximum values.
Reference
Here you can add a Reference field to connect the asset to specific categories. You can adjust its label, description, required status, and define whether the reference counts as a subcategory for this asset type. More details are provided later in this article.
Multi-Reference
This option allows you to add a Multi-Reference field, which supports multiple category references. You can configure its label, description, required status, and define multiple subcategory associations. Use this when more than one category reference is needed.
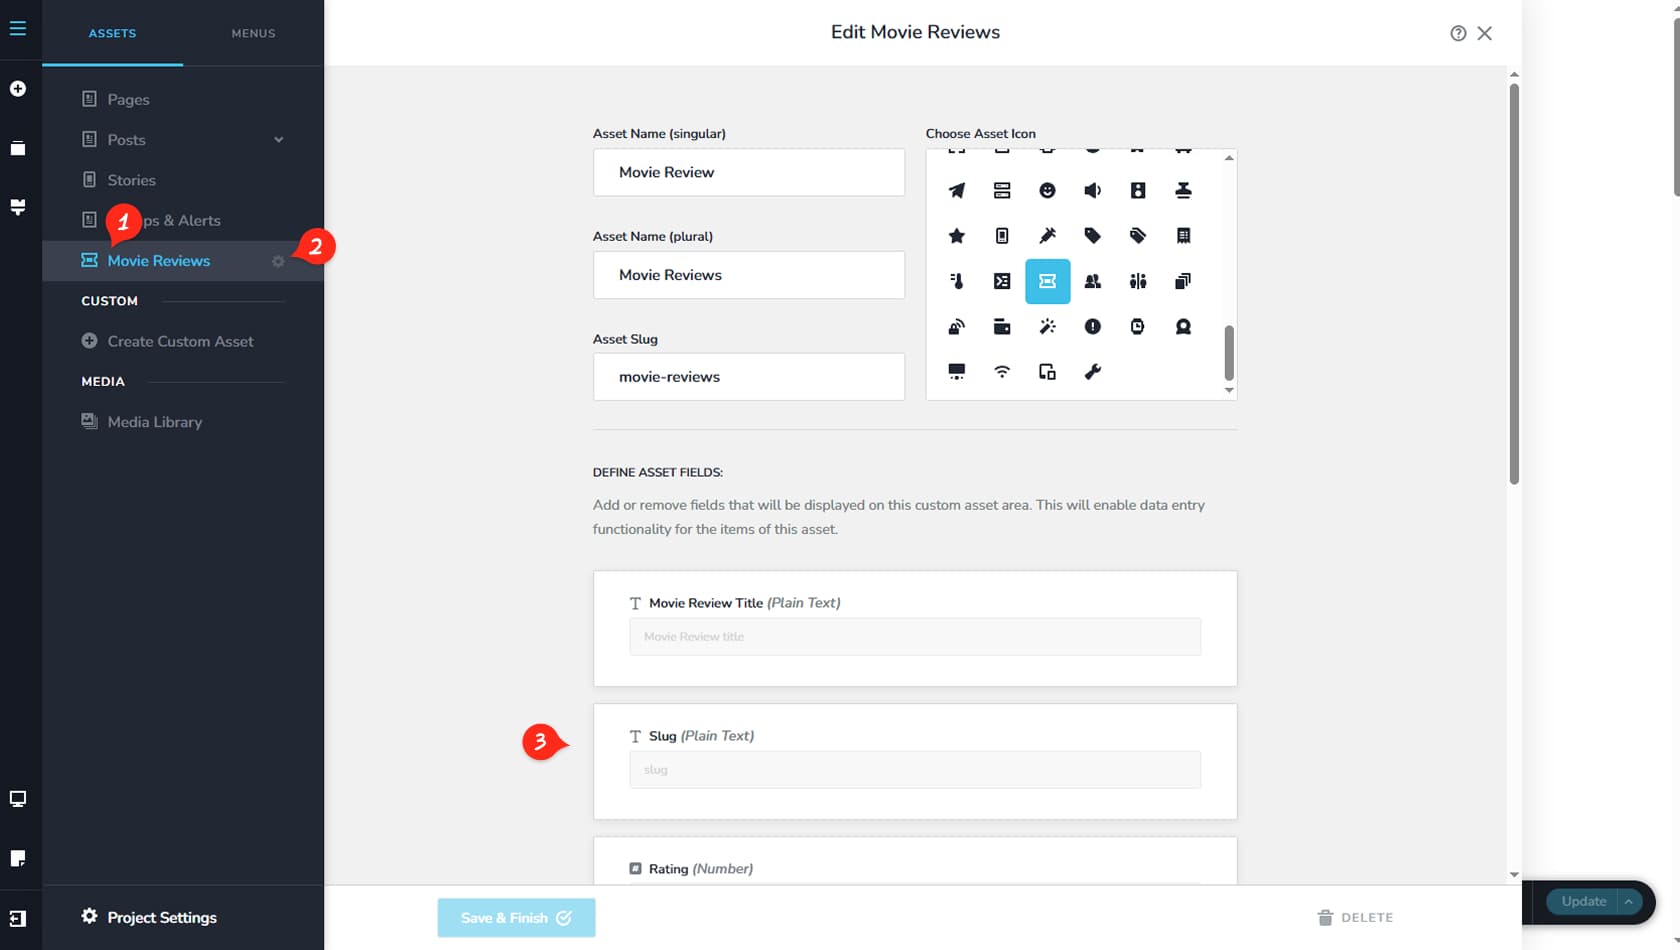
Custom Asset in CMS
After creating a Custom Asset, it will appear in the CMS with the name and icon you selected.
Edit Asset
By clicking the icon to the right of its title, you can edit the asset type and modify, add, or remove fields as needed.
Example of Asset
In this example, we created a Movie Review asset type.
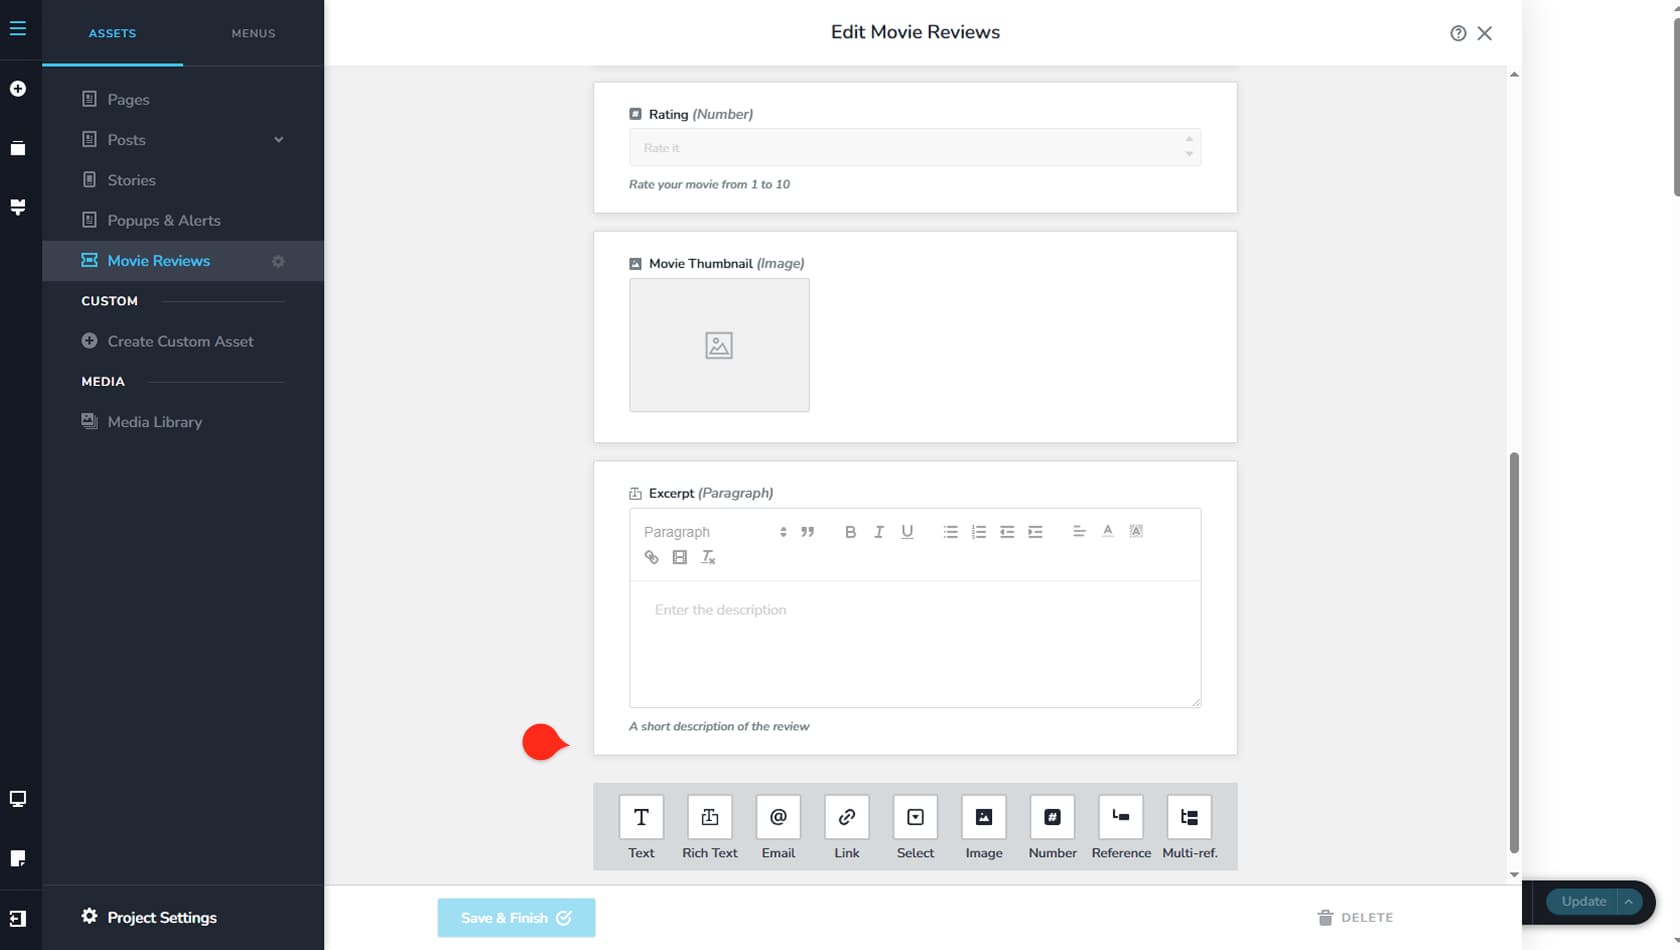
In this example, we added three fields to the custom asset type: a Number field renamed to Rating with a minimum value of 1 and a maximum value of 10, an Image field to serve as the movie thumbnail, and a Rich Text field for a brief review description.
The order of the asset fields does not affect how they appear on the front end.
Custom Assets Sub-Categories
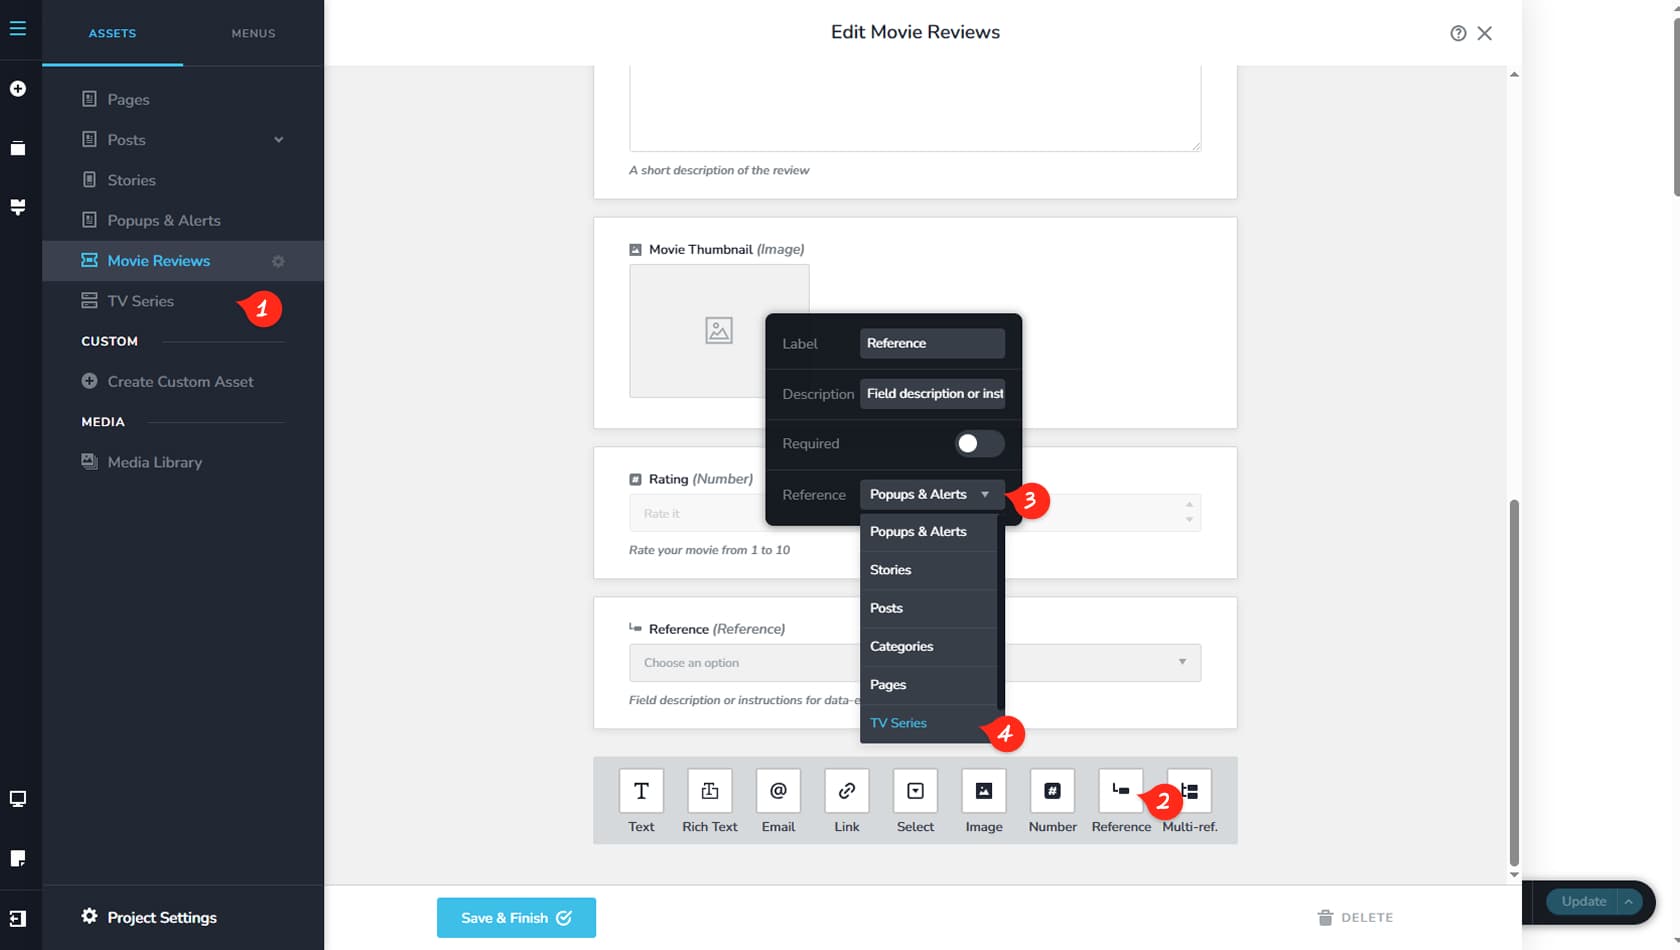
You can create categories for the posts in your asset by following these steps.
Create New Asset
To create a subcategory for your asset, begin by creating a new asset type. In this example, we created one called TV Series.
Add Reference Field
Next, edit the parent asset type (in this case, Movie Reviews) and add a Reference field.
Add Reference
Select the Reference field, then choose the Reference option within its settings.
Select Created Asset
Finally, select the newly created asset type and click Save & Finish.
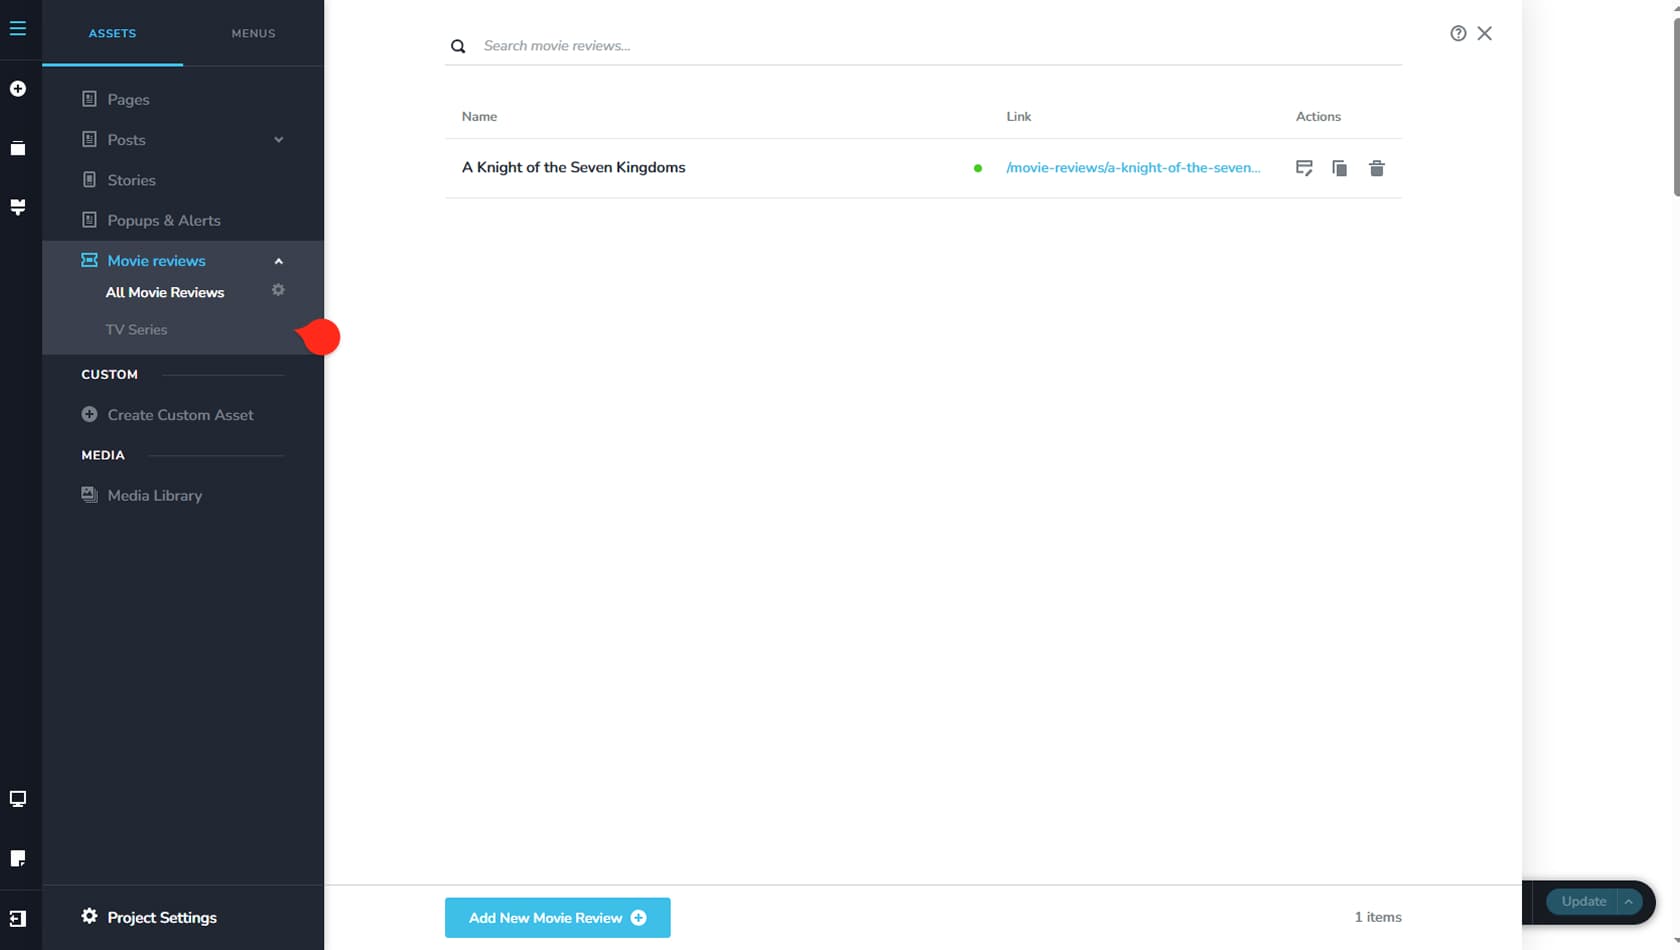
Once you save your settings, the new asset will appear under the parent asset as a subcategory.
How to Import Custom Fields on Front-End
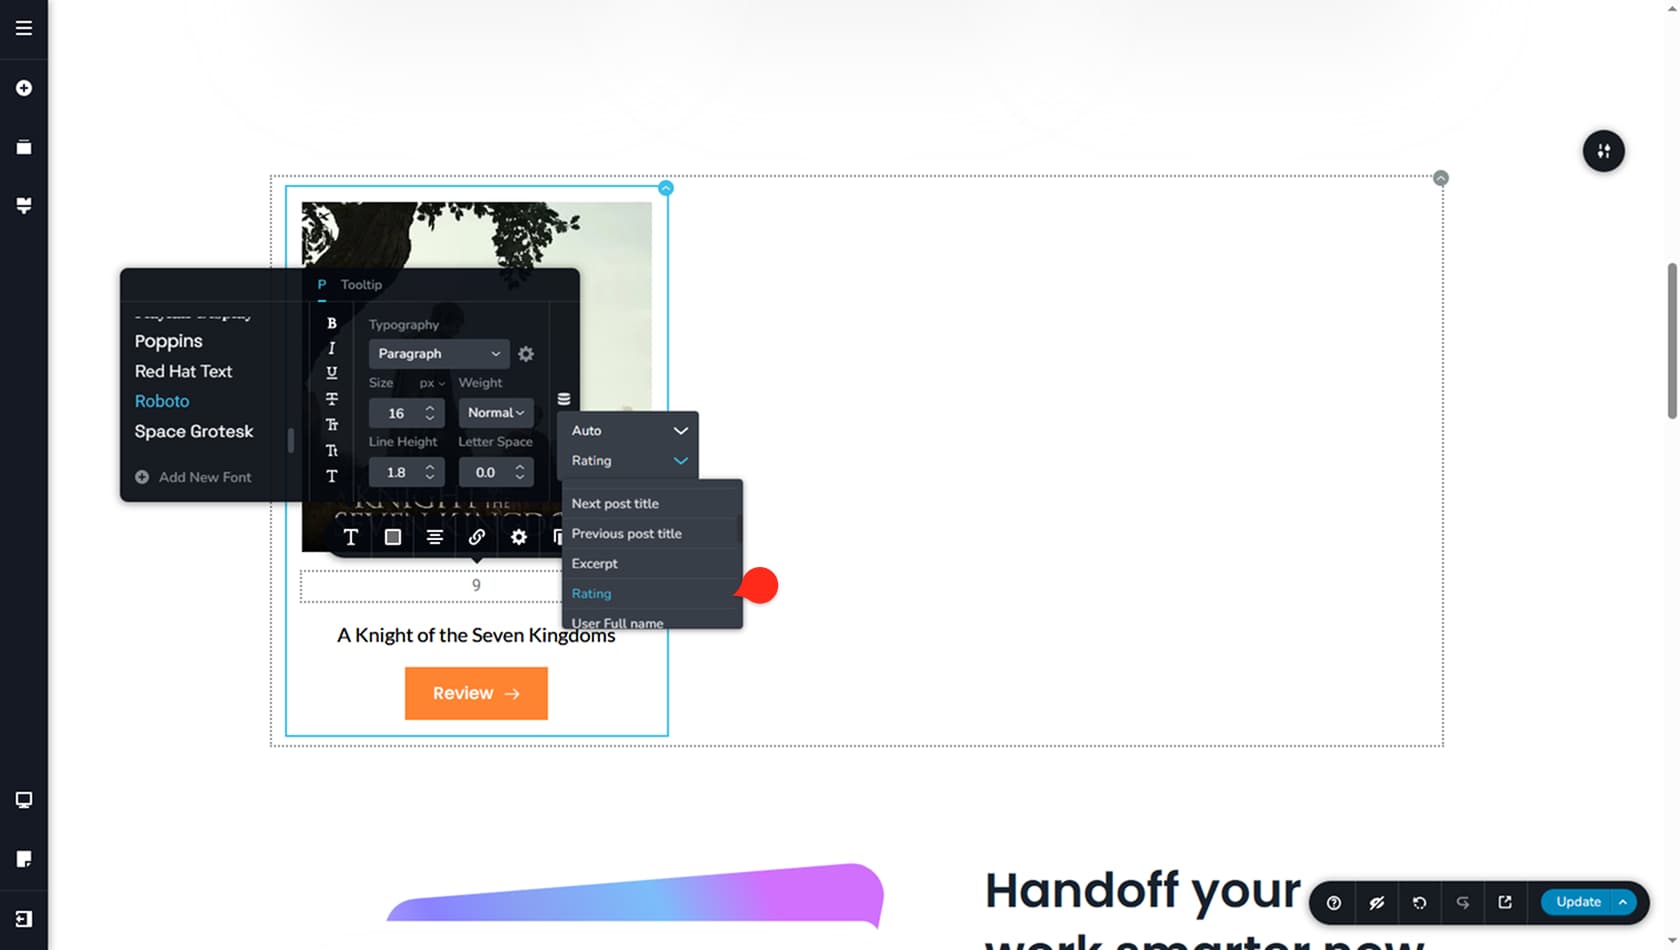
To display custom fields on the front end, there are two methods you can use. First off, you can use the Dynamic Elements icon for the specific type of field. For example, for a rating field which returns a number, a simple text widget will do. After dragging and dropping it anywhere in your post, navigate to Typography, click on the icon to the right and you will see 2 dropdowns. Select the second one and pick Rating from the list.
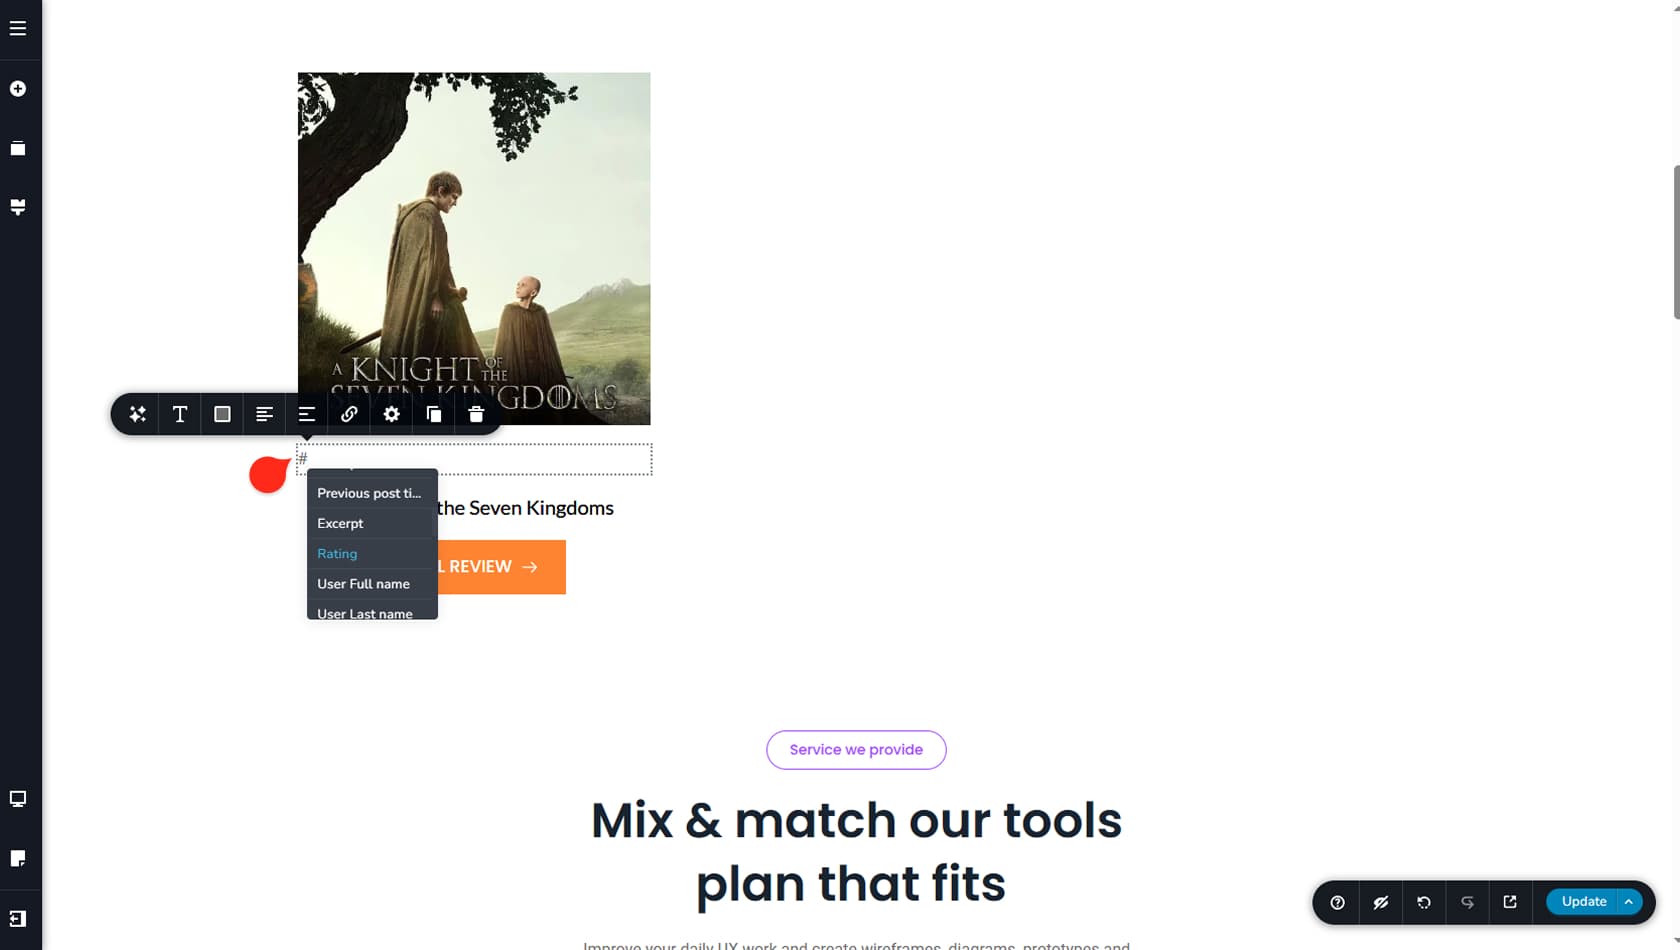
The second method is by using a dynamic text trigger. Drag and drop a Text widget, then replace its content with the “#” character. This will open a dropdown listing all available fields from your existing assets. Scroll through the list and select the specific custom field you want to display. This method works for any custom field that outputs text content.
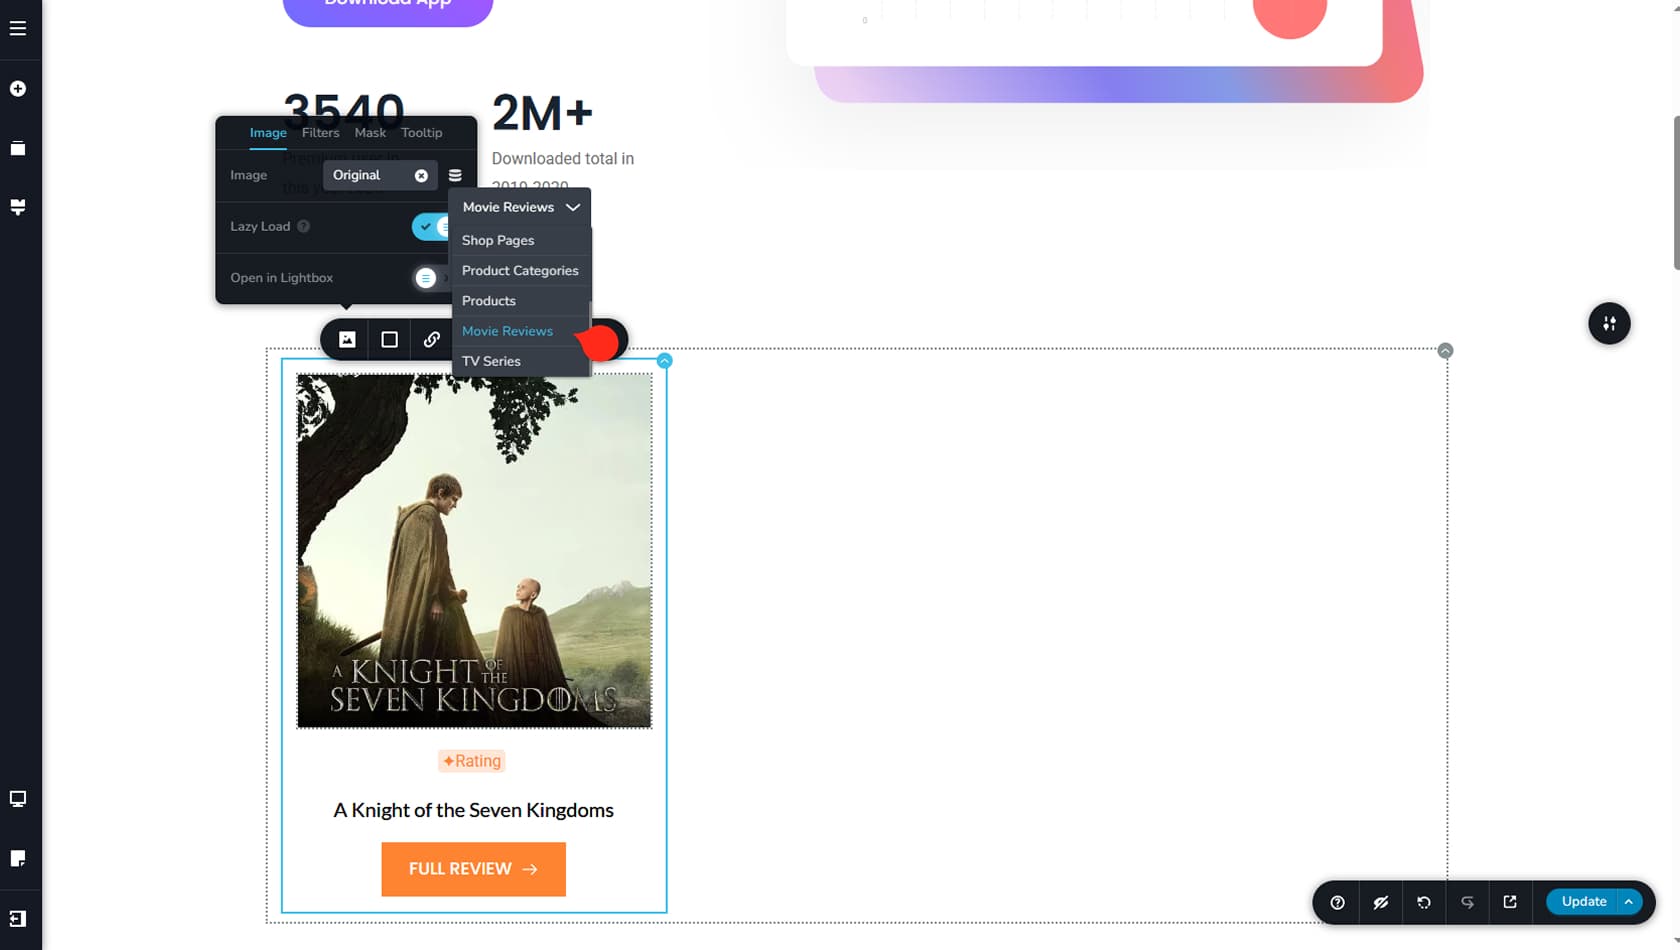
For images, instead of selecting Auto in the Image source as you would for blogging (see more in the Blogging article), choose the specific asset name from which you want to pull the image dynamically.
For more details on retrieving dynamic data, refer to the Dynamic Elements article.
For more details on posting your custom posts, the process is the same as in the “Blogging” article.